Nobody thought it was possible. But we did it. Introducing...
New "Volume Profile" Indicator Automatically Identifies High-Probability Market Turning Points For You and Instantly Shows You Low-Risk Trade Entries and Exits...
Before I tell you all the details about our new Drag & Drop Volume Profile indicator, let's go back to the very beginning:
Jesse Livermore, Charles Dow, Richard Wyckoff.
3 of the most iconic traders of the past. And they have 1 thing in common:
They all rely on volume as a basic tenet of their trading.
Following these giants' footsteps, it's time for retail FX traders to learn how to use volume in their trading too.
But maybe you're wondering...
Is It Relevant To The FX Market?
Maybe you've heard that there's no real volume in forex. Instead, we only have tick volume, which measures trading activity of market participants during a given time period.
But here's the kicker:
Recent research shows that there's a high correlation (as high as 97.9%) between tick volume and real volume...
In fact, here's a research paper that shows tick volume is a good proxy for actual traded volume in FX.
Now, if you look at the raw data that your brokers provide, what would you see?
It'd be something like this:
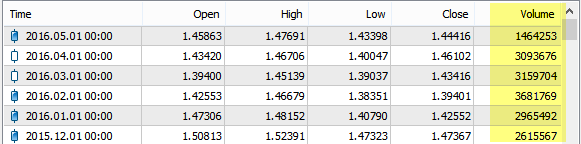
Do you see the problem here? The market gives you 2 important pieces
of information: Price and Volume. And if I have to guess, 95%
traders only use price in their analysis, and completely ignore
Volume which is equally important.
It changes TODAY.
Why? Because today we'll show you an unusual technique to analyze Volume in the FX market to identify high-probability market turning points, and pinpoint trade entries and profit targets.
This technique is called Volume Profiling. And I guess the first thing I should explain is...
What exactly is Volume Profile?
Volume Profile is a visual representation of how much volume occurs at each individual price over a certain period of time.
Here's an example:
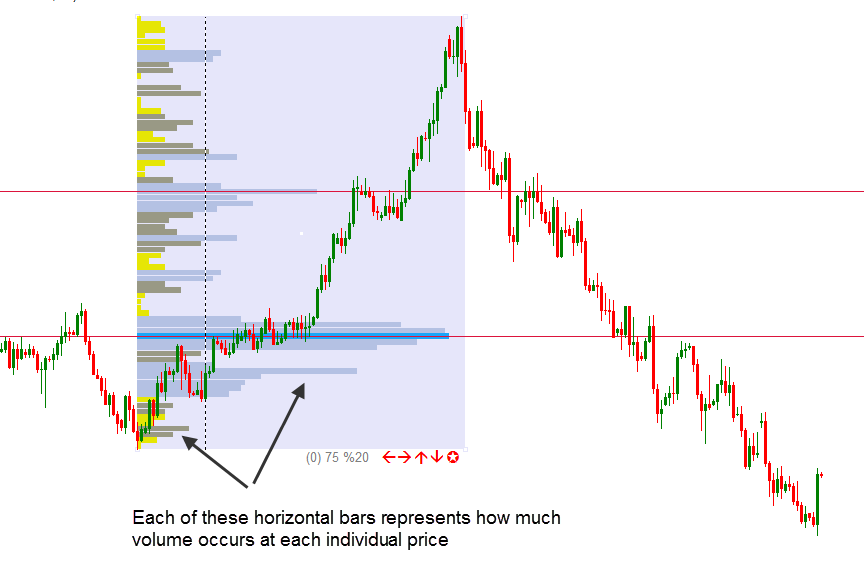
The colored box represents the range of bars over which this market
profile is calculated and drawn. The market profile itself consists of a
series of horizontal bars. And each bar represents how much volume
occurs at each price level over this time period.
By the way, here's the link to a Wikipedia article on Market Profile, a similar concept to Volume Profile. Read it if you'd like to dig deeper into this stuff.
You may notice that there are always some prices at which a lot of trading occurs. That means high volume. And we call these price levels: High Volume Nodes (HVN).
On the other hand, there are always some prices where very little trading occurs. That means low volume. And we call these price levels: Low Volume Nodes (LVN).
There's also a special price level where the most trading occurs. We call this level: Volume Point Of Control (VPOC)
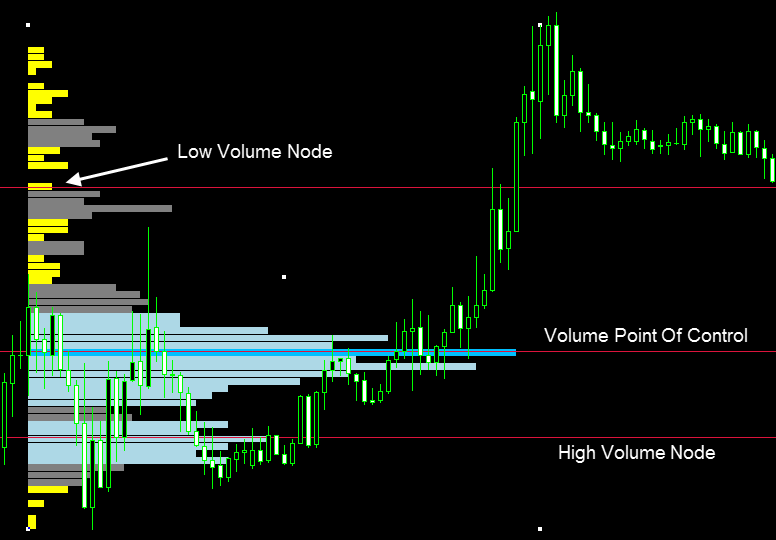
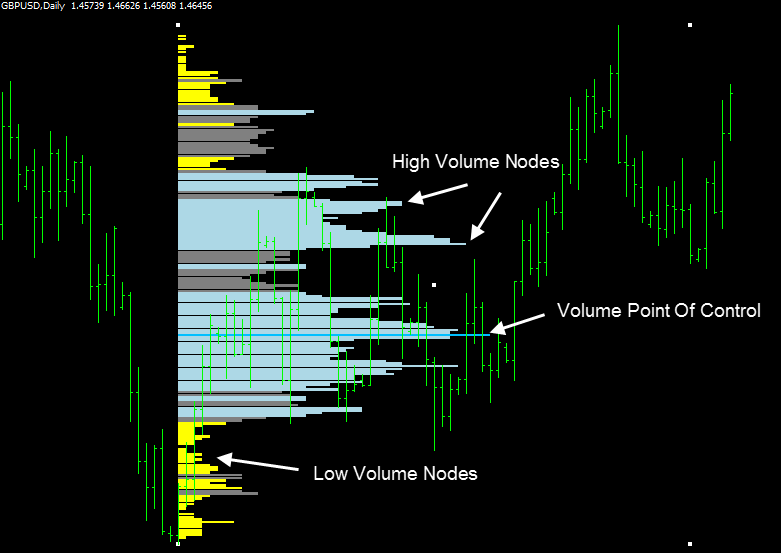
Let's mark these levels on the chart so you can thoroughly understand the concept:
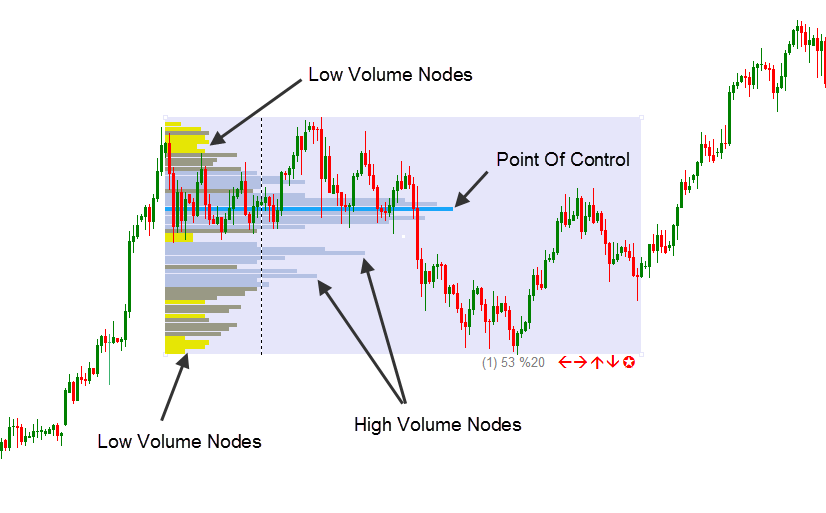
(This Volume Profile is drawn using our brand-new Drag & Drop Volume Profile indicator)
A few things you should note: The range of bars encompassed in the lavender rectangle is the period over which our Volume Profile is calculated.
The Volume Point Of Control is highlighted in turquoise. The Low Volume Nodes are highlighted in yellow. You can also notice a few High Volume Nodes that really stand out.
As mentioned, High Volume Nodes represent price zones where heavy trading took place between buyers and sellers. That also means that these prices are accepted by market participants. Buyers are happy to buy and sellers are happy to sell.
What's more important is that once the prices move out these High Volume Nodes, they are likely to act as strong support and resistance when the price revisitits these areas.
In other words, these High Volume Nodes are magnetic to price...
Price is likely to be drawn towards the High Volume Nodes. And this characteristic is invaluable because now you can plan your trades in advance, knowing which areas the price will likely gravitate to.
Here's an example on USD/JPY 4-hour chart:
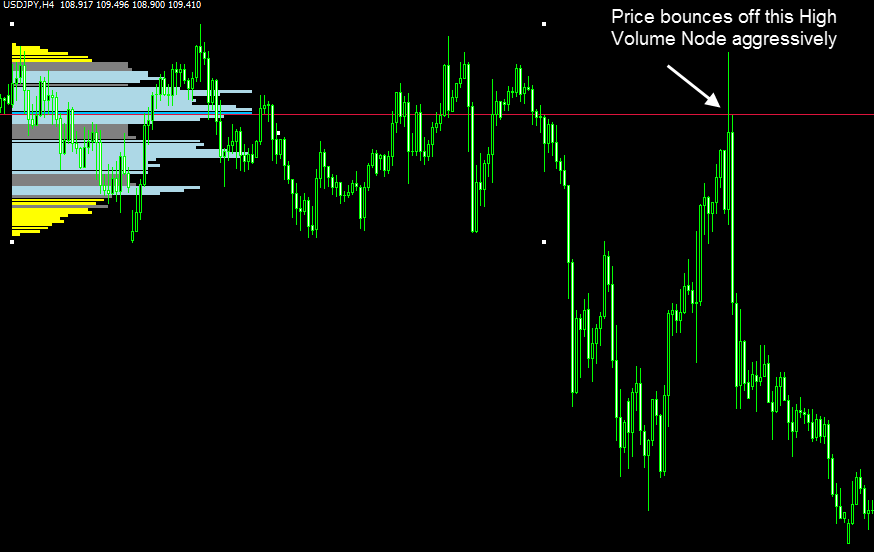
In this example, the price is stuck in a consolidation period for a
while before breaking out to the downside. We draw a Volume Profile
for this period of consolidation. The red line on this chart marks
the Volume Point Of Control (the most significant High Volume Node
of all) which is the price where most trading occurs.
After this period of consolidation, the price breaks out to the downside. Then it briefly rises again until it hits the Volume Point Of Control. And as you can see, the price bounces off this Volume Point Of Control very aggressively upon retest.
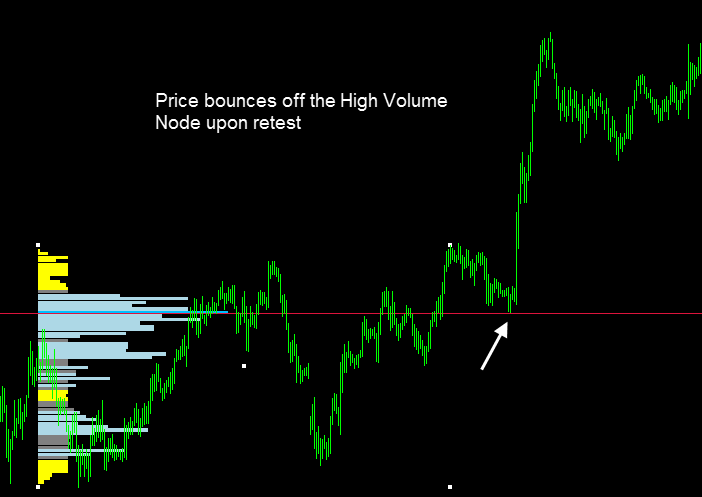
We learn 2 things from this example: First, High Volume Nodes are magnetic to price. Price likes to hang around these nodes. And that means once the price breaks out of the High Volume Nodes, it is likely to gravitate towards these levels again and retest them.
And second, High Volume Nodes often act as strong support and resistance levels. And in our experience, more often than not, the price will aggressively bounce off these High Volume Nodes upon retest.
Here's another example to really drives these concepts home:
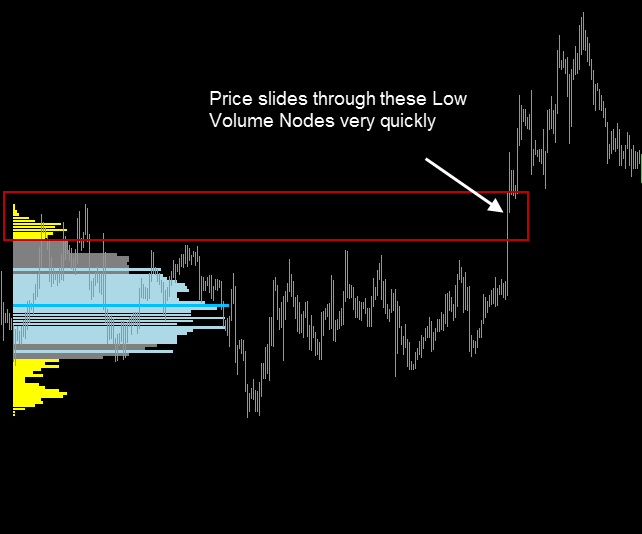
Now, let's talk about Low Volume Nodes. These represents the prices at which there's little trading taking place. And that means the market participants think these prices are unfair.
When price revisits these Low Volume Nodes, it will either move through these zones very quickly, or get rejected very quickly.
An example of price sliding through these zones fast:
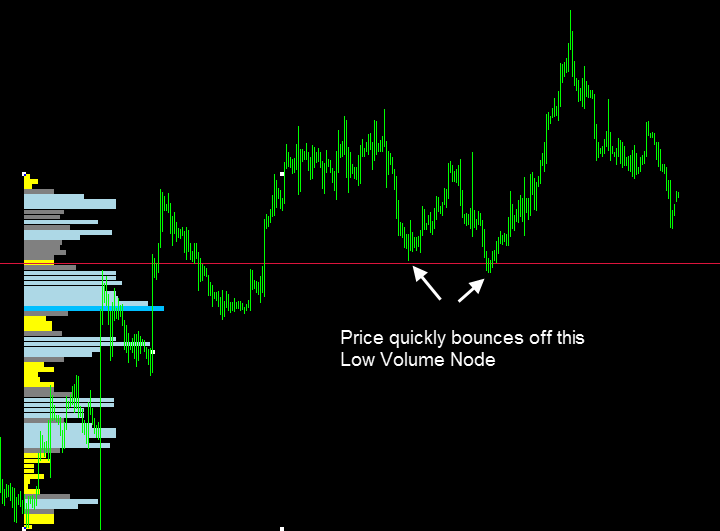
And here's an example of price gets rejected when testing these Low
Volume Nodes. Although the probabillity of price bouncing off Low
Volume Nodes is lower than price bouncing off High Volume Nodes,
when it does happen, it's usually very quick. And that allows us to
use a tighter stop and hopefully win a trade fast:
Now, let's discuss Volume Price Of Control (VPOC). This is the price at which the most trading occured. Take this example on USD/JPY 30-minute chart:
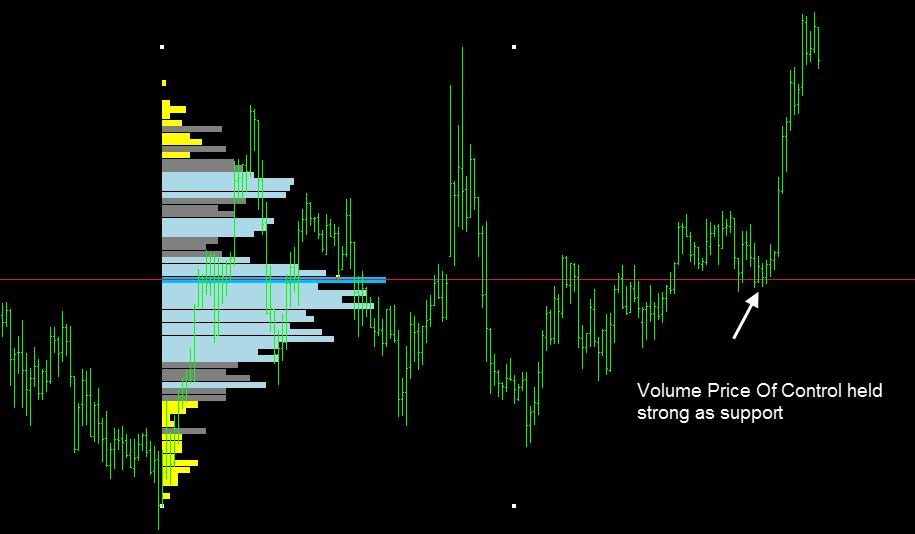
In this example, we draw the Volume Profile over a period of several
trading sessions. The VPOC of this Volume Profile is immediately
retested the following day. And it held strong as support. If you
decided to take this trade, it would give you a low-risk entry.
We still haven't talked about one of the most useful feature of Volume Profile. And it is that:
Volume Profile shows you the market's structure and provides context for current price action. And they gives you clues to where big support & resistance levels are...
For example, take a look at this daily chart:
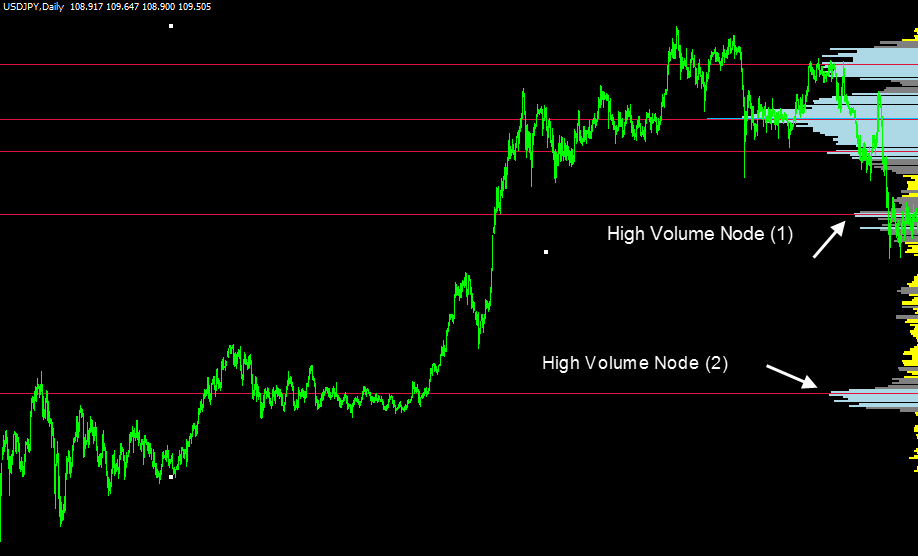
In this example, we draw a Volume Profile over the last 750 trading
days. And this Volume Profile immediately shows you the structure of
the market, and helps you instantly see where the big support and
resistance levels exist.
We mark these levels - which are High Volume Nodes from the Volume Profile - as red horizontal lines on this chart. There are 2 particularly important levels: High Volume Node (1) and High Volume Node (2) which will be very useful when we switch to a lower timeframe (4-hour in this case) to find potentially entries and exits.
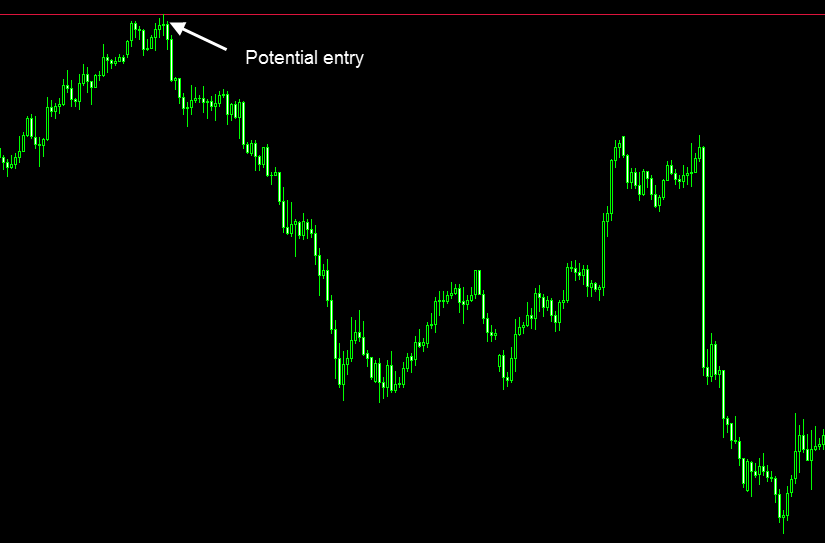
Now, let's take a look at the 4-hour chart and focus on the current price action:

On the 4-hour timeframe, the current price is retesting High Volume
Node (1). And it would provide us with a low-risk entry for going
short (in the direction of the longer-term bearish trend) as we
expect this High Volume Node to hold as resistance. In addition,
since price usually gravitate towards High Volume Nodes, I'd
personally use High Volume Node (2) as my profit target.
Let's see how this trade works out:
As expected, price gets rejected by the High Volume Node (1) and
starts to move down aggressively. I hope this example helps you
understand how one might use Volume Profile to determine potential
entries and exits.
While this example uses High Volume Nodes as potential entries, did you know that...
You could also use Low High Node to identify high-probability entries...
Take a look at this EUR/USD 30-minute chart:

In this example, we draw a Volume Profile over yesterday's market
action. Pay attention to the Low Volume Node that I highlight on the
photo, it would become very useful later on. But first, let's
analyze today's price activity:
As you can see, the price starts to drift lower. Since we know that
price tends to move through Low Volume Nodes quickly, I'd assume
that once the price hits this Low Volume Node, it would slide
through this zone fast and continue its downward move. So this Low
Volume Node would give me a low-risk trade entry.
What about profit targets? This is where Volume Profile comes in handy again, because:
You could use Volume Point Of Control and High Volume Nodes as profit targets...
In this case, I'd use the Volume Point of Control and High Volume Node I highlight on the photo as my profit targets.
Let's see how this trade works out:
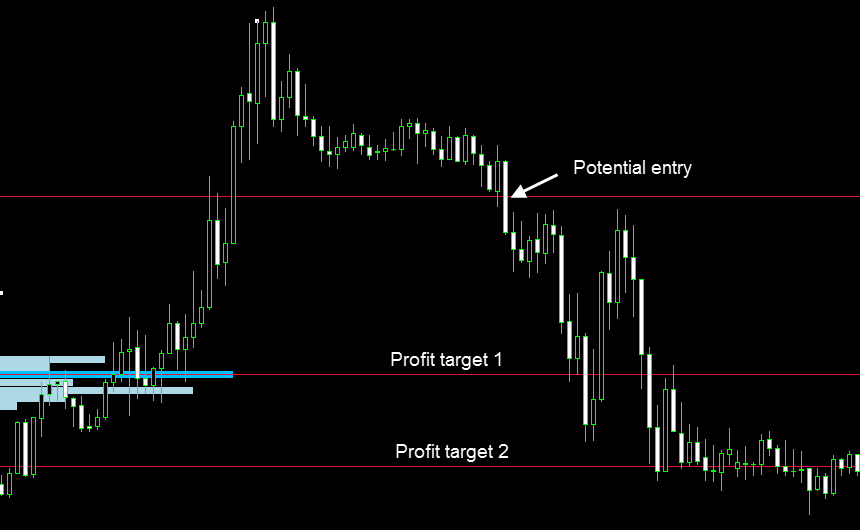
As expected, once the price hits the Low Volume Node, it quickly
slides through this zone and falls aggressively. Both of our profit
targets are hit quickly.
Did you notice how the price hangs around our Profit Target 2 (which is a High Volume Node) for quite a while? That's also expected because remember, High Volume Nodes often acts as price magnets. And price likes to gravitate to and hang around these areas.
This also means that once the price breaks out of this support zone, it will likely continue to move downward. And that's exactly what happens in this case:
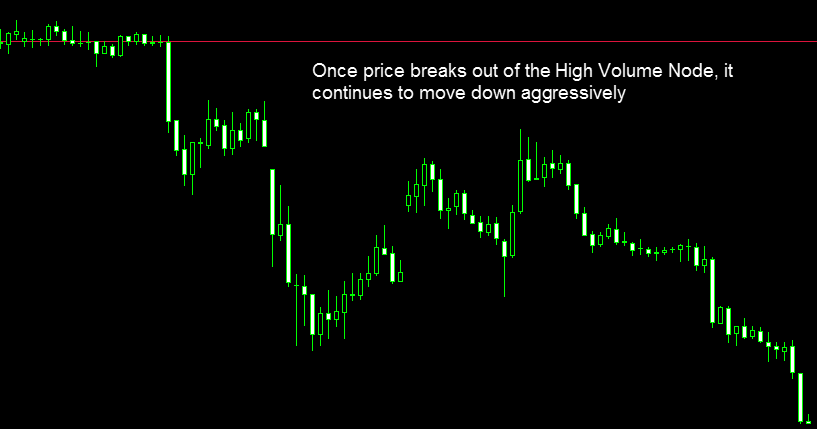
By now, you've seen the power of analyzing volume through the use of
Volume Profile. These principles are timeless. They worked 20 years
ago. And they're working now.
But the reality is there are not a lot of traders who are profiting from Volume Profile right now. Why? Because there was no indicator available for the forex market that could calculate and display this kind of Volume Profile.
Until now. Introducing...
"Drag & Drop Volume Profile" Indicator
It is, to my knowledge, the FIRST-EVER Volume Profile that's developed specifically for the forex market.
And all these cool Volume Profiles that you've seen above are drawn by this "Drag & Drop Volume Profile" indicator.
The "Drag & Drop Volume Profile" indicator helps you easily draw a Volume Profile over ANY time period that you select.
And it's literally Drag & Drop: Just drag the indicator over the range of bars which you want to calculate a Volume Profile for. And the indicator takes care of the rest for you.
Here's a short clip to show exactly how it works:
See how easy it is?
To adjust the range of bars (over which our Volume Profile will be calculated and drawn), just click on the corner of the Volume Profile and drag it to where you want. Like this:
To select a new range of bars over which our Volume Profile will be calculated and drawn), just click on the center of the Volume Profile and drag it to a new location. Like this:

And here's what's even more important:
Our "Drag & Drop Volume Profile" indicator instantly shows you all the critical price levels: Volume Point Of Control, High Volume Nodes, Low Volume Nodes...
Take this example on GBP/USD daily timeframe:
With just one glace at this Volume Profile, you instantly know where
all of the most important price levels are: Volume Point Of Control
in sky blue, High Volume Nodes in light blue, Mediume Volume Nodes
in gray, Low Volume Nodes in yellow.
And it gets even more exciting:
You can even adjust the look of the indicator in any way you'd like using the indicator's convenient toolbar...

It's that simple: Click on the left or right button to change the
relative length of the Volume Profile bars. Click on the up or down
button to increase/decrease the number of bars in a certain Volume
Profile.
In addition...
You can also choose to display the Volume Profile on the left or on the right hand side of the selected range of bars...
Here's an example of 2 Volume Profiles on a single chart: one displayed on the left hand side, the other on the right hand side of the selected period:
But maybe the most interesting feature of all is that:
You can apply as many Volume Profiles on your chart as you'd like...
That's right, you can apply as many Volume Profiles on your chart as you'd like (up to 20 on each chart).
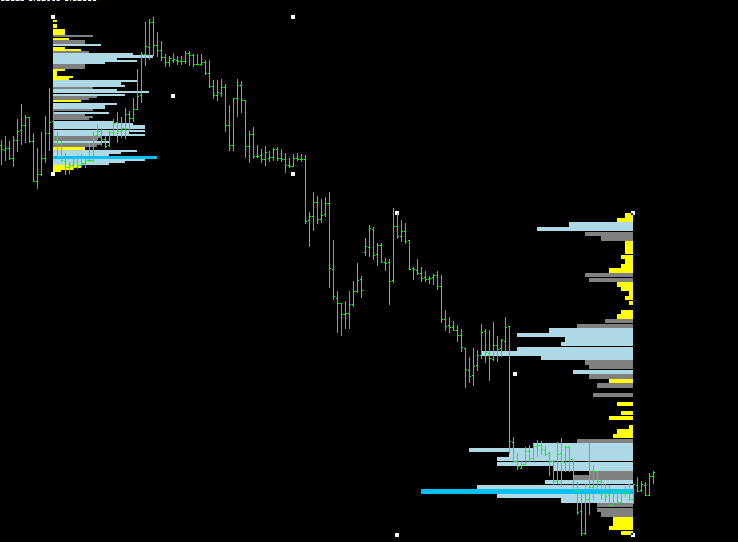
Here's an example where I draw 3 Volume Profiles on this AUD/USD 30-minute chart:
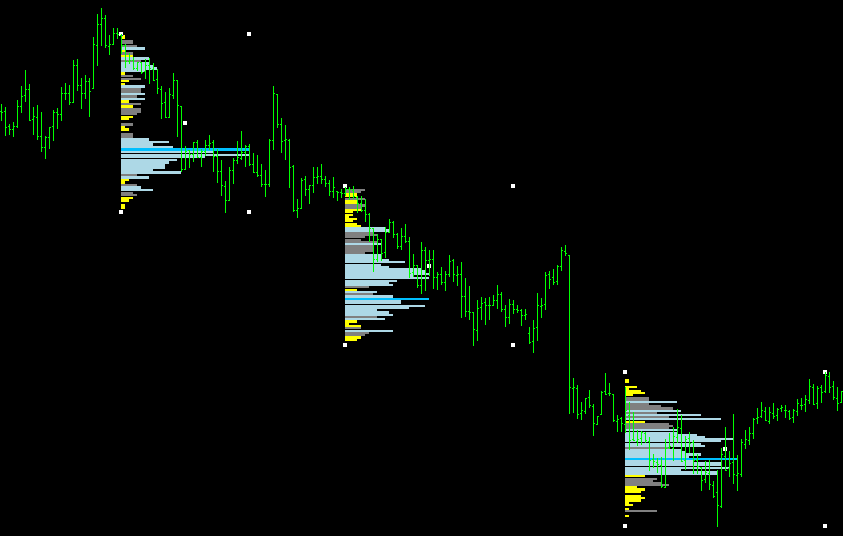
Let's recap all the cool things our "Drag & Drop Volume Profile"
indicator can do for you:
+ "Drag & Drop Volume Profile" is an indicator that works for Metatrader4. And helps you easily calculate and build a Volume Profile for ANY time period that you select.
It's as easy as drag and drop the Volume Profile wherever you want on your chart.
+ With just one look at the Volume Profile, you'll instantly know the exact volume traded at every price, and where support and resistance are hiding. And you can instantly determine at which price a lot of trading occurs... and at which price nobody wants to buy or sell.
+ Once a Volume Profile is drawn, you can immediately identify important areas (Volume Price Of Control, High Volume Nodes, Low Volume Nodes) which will likely point to significant future support & resistance zones.
+ And you can use these important areas to pinpoint the best possible trade entries and exits. It makes your job as a trader much easier. The indicator does most of the hard work for you.
Single Indicator
one-time payment
- Get Drag & Drop Volume Profile - Lifetime license.
- All features included.
- Platform: Metatrader 4
Technical details:
- This indicator works on Metatrader 4
- Current version: 1.5
- You can use the indicator on ANY instrument your Metatrader 4 offers:
FX pairs, Gold, Silver, Indices, Futures, Stocks...
- Your license includes 1 year of updates and support. After one year, you can purchase an update & support plan to continue to receive support & updates (not compulsory)
- Please remember: There are no refunds and all sales are final.
Good trading,
Frank